|
Good morning! Sorry for not posting as often as I said I would. So here's today's post!         Repeat until you have 16 of these in total.  I hope you enjoyed that tutorial! bye bye~~ \(⌒▽⌒)
1 Comment
Good afternoon! Sorry for not posting anything for a few days. Ive decided to try something thing different. I wanna make some guest blogs. Basically this means if you want to blog about something on my website, just email me a blog post made by you and I'll post it on my page and of course make sure everyone knows that you're the one that wrote. I dont like claiming others work as mine cuz I know I wouldnt like it if someone did it to me. If you have an idea my email is [email protected] I cant wait to hear from you. Thanks for being patient with me and see you next time! bye bye~~ \(⌒▽⌒) Good afternoon! I hope you all had a good week. Mine was very busy and exhausting (~O~) Today I have a delicious recipe for you. Not like the other recipe I posted. This is the recipe I use to make my favorite cookies and I hope you'll try out this cookie recipe too! Here's a picture of what they'll look like.  Checkerboard cookies recipeSorry for not posting anything yesterday. (*_ _)人 I started my first day of spring semester yesterday and by the time I finally managed to relax, I was too exhausted mentally to even consider the thought of posting anything on my blog. I'll be really busy with school from now on but i'm still gonna try real hard to keep up with my blog. It would also help if you guys could give me ideas on what to post as well since by the end of the day my brain is too worn to come up with ideas. I appreciate all my readers who have been patient with me and I hope you all keep reading my posts. I will end this with pictures of cute puppies. (I do not own these pictures) Good afternoon! I hope everyone had a wonderful memorial's day. Today I have another origami tutorial for you. Yay! °˖✧◝(⁰▿⁰)◜✧˖° Step 1: Take a square sheet of paper, any size and place it white side on top.  Step 2: Fold one corner over to the other and then unfold.   Step 3: Fold the left corner over to the right corner and then unfold.   Step 4: Fold the top corner down to the middle and crease.  Step 5: Fold bottom corner all the way to the top and crease. Make sure it doesn't go past the top edge like in the picture. (I took it at a bad angle it doesn't actually look like that)  Step 6: Fold the right side over so that it lines up with the crease in the middle. Then do the same with the left side.   Step 7: Flip it over so that you are now looking at the backside.  Step 8: Fold the triangles on top down so that they look like this.  Step 9: Take the corners on the side and fold them in so that they look like this.  Step 10: Flip it over so that you are looking at the front side. Now you can see that you have made a heart.  I hope you enjoyed that tutorial and that you fill these hearts with lots of love so that whoever sees it knows that they are loved.
Thank you for reading and see you next time! bye bye~~ \(⌒▽⌒) Hello! ~ヾ(・ω・) Today I made tamago egg biscuits.....or at least what looks like some. My first try was a fail and I made something similar to oobleck. So I threw it away and tried again. My second batch came out a little better so I decided to cook it. I took it out of the oven and thought my second try was successful. I quickly changed my mind once I tried some. They tasted like powder that when mixed with saliva became a thick paste in your mouth. _:(´ཀ`」 ∠):_ At least they look pretty though right?  I'll post the recipe down below. Maybe your batch will come out more successful and tasty than mine. Tamago boro recipeIngredients
I hope you enjoyed that tutorial! Let me know how they turn out. I'd love to see your successful and/or failed batches.
Thank you for reading and see you next time! bye bye~~ \(⌒▽⌒) Hey everyone! I don't have a tutorial today because I wanted to talk about the pillow cases I made. 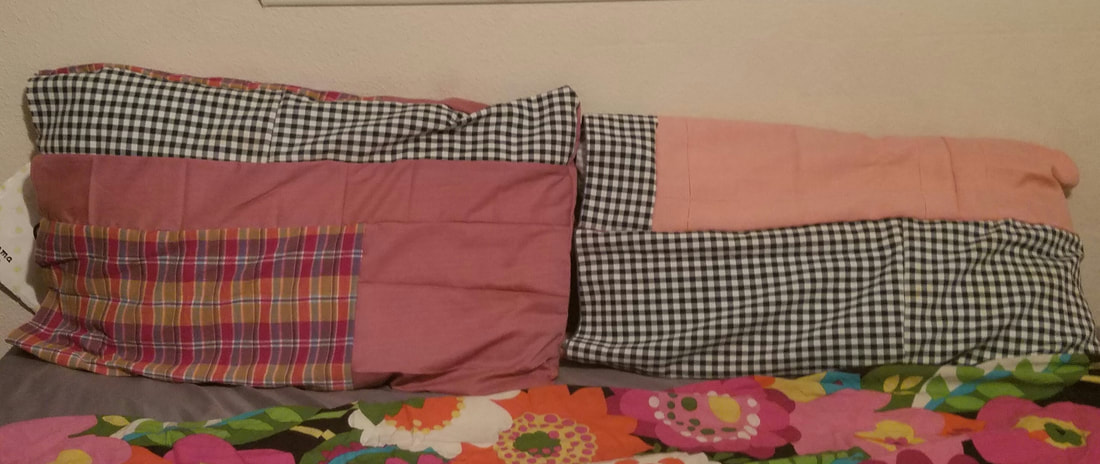 What do you think? I hope you like them because I do. I worked real hard on them and I think they came out looking pretty kawaii. Does looking at this make you want some homemade pillow cases too? Well... I guess I can tell you what I used to make them. I used multiple cloth napkins. Clean ones of course. It's amazing what you can make with simple items such as these. You don't have to buy expensive material from the craft store. All you need to do is visit your nearby thrift store. I like to shop there for random things a lot. It's amazing how many cute things you can find there for a good price. Before you put away your laptop or phone, check out valoros origami on youtube for more origami. https://www.youtube.com/channel/UC1P8IKvZAWAF4iM01bFs-wg
Thanks for reading and see you next time! bye bye~~ \(⌒▽⌒) Hello again! I hope everyone had a good morning! Today i'll be showing you how to make an origami box. Sounds easy enough right? Well, that's because it is. I hope you all enjoy my first tutorial and I apologize in advance for the poor picture quality. I had to take the pictures on my phone ( ̄▽ ̄*)ゞ First you'll need a sheet of paper, color side on top. Any size will work as long as it is square and not rectangle or any other shape. I used 3x3 origami paper because that's what i'm used to working with. But if you don't want a tiny box, i'd recommend using a bigger box.  For the next step you will do 2 valley folds.   Then you will open open it up so that it looks like this.  Once you do that, you will need to flip it over so that the white side is on top. Then you will need to fold each of the corners to the middle like so.   For the next part you will be folding the top and bottom edges to the middle and the unfolding them.   Then you'll fold the left and right edges to the center and then unfold them.   Once your paper looks like this you will unfold the left and right triangles.  The next step is probably the hardest. You will now bring up the top and bottom edges to start creating a box.  For the last step you will need to tuck in the left and right flaps.  Your origami box is now complete! You can now use the box to store little items in if you'd like.   I hope you enjoyed that tutorial. I will try and post different craft tutorials as well in the near future. But for now it'll just be origami. If there's anything specific you'd like me to make please feel free to write a comment about it in the comments section of my blog.
Thank you for reading and see you next time! bye bye~~ \(⌒▽⌒) Thank you for visiting my first blog! I am shiba-kun and am here to bring you lots of cute stories and craft tutorials. °˖✧◝(⁰▿⁰)◜✧˖° I hope you enjoy reading my future blogs! I will try to update everyday or every other day. So please keep an eye out because my next blog will be worth reading.
See you next time! bye bye~~ ( ´ ▽ ` )/ |
AuthorThis is my first time making a blog so feel free to give me advice or ideas on what to write about. ArchivesCategories |


 RSS Feed
